


")

")


Cavity Closers
Benefits
- Prevent water penetration The use of a cavity closer will prevent the ingress of water around a window or door.
- Prevent heat loss and cold penetration Thermal loss can result in problems of condensation, staining and mould growth at the reveals of these openings. Prolonged exposure to this will lead to a deterioration of the internal plaster and paint work.
- Create a fire barrier A fire rated cavity closer can prevent the spread of fire.
Installation
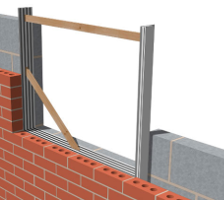
Fitting a cavity closer during brick work
- Make an accurate (timber) template the same size as the structural opening.
- Cut cavity closer to the size of the sill and jamb.
- Tack or nail the cavity closer to the window or the timber former along the sill and jamb.
- Remove the relevant flanges on the run on so you are left only with the cavity width portion.
- Position the window frame with 30mm overlap of cavity closer from the inside of the outer skin.
- Position the window with the cavity closer attached onto the sill in the required position.
- Ensure the timber window is level and upright then prop up in position.
- Build up the two wall skins ensuring that they butt up tight to the closer.
- Build inner skin up to the inside flange of the cavity closer and butt to the outer skin.
Fitting a cavity closers posts brick work
- Cut cavity closer to cavity size.
- Push fit the cavity closer into the opening ensuring that the exposed insulation points towards the internal skin.
- Push fit the sill section in place, ensuring that the cavity closer butts up to the jambs.
- Use galvanised or stainless steel nails to fix the flange into masonry.
Choose subcategory or scroll down to see products

Showing 1 to 17 of 17 (1 Pages)


Guide Price
Brand: YBS Insulation
Model: 2.5m
Delivery Time: 1 - 2 days
YBS Cavi-Mate EPS Cavity Closer is a new, robust window installation system ideal for the new build market. Manufactured from high quality PVC-U, it is a window former, locator and cavity closer, which enables Contractors to fit window frames quickly and easily by building around the sub-frame then ..
Guide Price: £8.69
£10.43 inc VAT
Guide Price
Brand: Kingspan
Model: flangeclip
Delivery Time: 2 - 3 working days
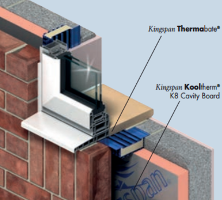
Standard Flange Clip for use with Kingspan Thermabate Cavity Closers and for use as a weather check, for fixing closer sections to window frames, and for retaining partial fill insulation batts in the cavity. Supplied in one meter lengths. Colour coded to green.CERTIFICATIONKingspan Thermabate is ma..
Guide Price: £2.93
£3.52 inc VAT.")
.")
Guide Price
Brand: Kingspan
Model: 100x2400mm
Delivery Time: 5 - 7 days
100mm Kingspan Kooltherm Cavity Closer is a PVCU extrusion with a rigid thermoset insulation core, which provides a simple and efficient method of closing cavities around openings in cavity walls. It is suitable for use with timber, metal or PVC window frames and can also be supplied to order in cur..
Guide Price: £225.53
£270.64 inc VAT
Brand: Kingspan
Model: extensionclip
Delivery Time: 2 - 3 working days
Flange Extension Clip for connecting Kingspan Thermabate to extend the width of the fixing flange. It enables positive fixing of frame over suspect masonry. Supplied in one meter lengths. Colour coded to white.CERTIFICATIONKingspan Thermabate is manufactured to the highest standards under a manageme..

Brand: Kingspan
Model: revealclip
Delivery Time: 2 - 3 working days
26mm Reveal Clip to help construction of check reveals and gives additional protection to the frame assembly.Supplied in one meter lengths. Colour coded to white.CERTIFICATIONKingspan Thermabate is manufactured to the highest standards under a management system certified to ISO 9001: 2015 (Quality m..

Brand: Kingspan
Model: jointingclip
Delivery Time: 2 - 3 working days
Jointing Clip connects two sections backtoback along their length to suit cavity widths of up to 300 mm in circumstances where a single section, Kingspan Kooltherm Thermabate Cavity Closer or Kingspan Kooltherm Cavity Closer will not suffice. It should be installed in 100 mm lengths at 300 mm centre..

Brand: Kingspan
Model: jointingstrip
Delivery Time: 3 - 5 days
Jointing Strip that aligns and connects two abutting cavity closer sections along their cross–sectional plane. It allows for opening sizes greater than 2.4 metres, and for the reduction of wastage through the use of off–cuts. Limited to one butt joint per side of the opening.. Colour coded to Grey.C..

Brand: Cellecta
Model: 75mm - 2.5m
Delivery Time: 3 - 5 days
75mm Cellecta Unicloser X Single Flange Cavity Closer made of Hexatherm extruded polystyrene with one U-PVC damp proof course profiles. This cavity closer will eliminates cold bridging around window and door openings.CHARACTERISTICSHigh quality Hexatherm extruded polystyrene,Rigid U-PVC profile,Eli..

Brand: Cellecta
Model: 75mm - 2.5m
Delivery Time: 3 - 5 days
75mm Cellecta Unicloser X Double Flange Cavity Closer made of Hexatherm extruded polystyrene with two U-PVC damp proof course profiles. This cavity closer will eliminates cold bridging around window and door openings.CHARACTERISTICSHigh quality Hexatherm extruded polystyrene,2 Rigid U-PVC profiles,..

Brand: Manthorpe
Model: G240-100 - 2.5m
Delivery Time: 1 - 2 days
G240 100mm Double Flange Thermal Cavity Closer from Manthorpe Building Products is a high-performance cavity closer designed to provide thermal insulation and moisture control at door and window reveals in cavity wall constructions. Featuring a double flange profile, it offers secure positioning wit..
£78.02
£93.62 inc VAT
Brand: Manthorpe
Model: 165mm x 25mm x 100mm - 10m
Delivery Time: 1 - 2 days
165mm Stonecor Insulated Vertical DPC & Fire Barrier a premium-grade insulated damp-proof course (DPC) designed to close cavities using a returned blockwork detail, while also delivering 30 minutes of fire protection. It’s a complete solution for tackling thermal bridging, moisture ingress, and fire..
£32.34
£38.81 inc VAT - 17mm x 100mm - Cavity Closer")
Brand: Manthorpe
Model: 165mm x 17mm x 100mm - 6m
Delivery Time: 1 - 2 days
165mm Damcor Insulated Vertical Damp Proof Course (DPC) a rolled insulated DPC designed to provide a thermal break and moisture barrier at door and window reveals where the cavity is closed using a returned blockwork detail. It’s a simple yet highly effective solution to combat cold bridging, conden..
£14.36
£17.23 inc VAT - pack of 100")
Brand: Manthorpe
Model: G245 - 100nos
Delivery Time: 1 - 2 days
G245 Cavity Closer Fixing Clip (Tie) a practical accessory designed to securely anchor Manthorpe cavity closers into masonry walls. Manufactured from durable injection-moulded polypropylene, the clip allows for easy installation and alignment of cavity closers, helping reduce waste and improve build..
£27.59
£33.11 inc VAT
Brand: Manthorpe
Model: 50/70mm - pack of 3
Delivery Time: 1 - 2 days
Redshield Cavity Barrier - 50/70mm is an all-in-one solution designed to meet the fire safety, thermal insulation, and damp-proofing requirements of modern cavity wall construction. Suitable for cavity widths between 50mm and 70mm, this product offers a streamlined approach to compliance with Approv..
£79.47
£95.36 inc VAT
Brand: Manthorpe
Model: 50/70mm - pack of 3
Delivery Time: 1 - 2 days
Redshield Cavity Barrier Rebated - 50/70mm is an all-in-one solution designed to meet the fire safety, thermal insulation, and damp-proofing requirements of modern cavity wall construction. Suitable for cavity widths between 50mm and 70mm, this product offers a streamlined approach to compliance wit..
£79.47
£95.36 inc VAT
Brand: Manthorpe
Model: WCMULTICOR - pack of 6
Delivery Time: 1 - 2 days
WCMULTICOR from Manthorpe Building Products is a versatile, high-performance cavity closer designed to suit cavity widths ranging from 50mm to 100mm. Engineered for ease of use and regulatory compliance, it provides a thermal break, acts as a vertical damp-proof course (DPC), and helps eliminate col..
£65.81
£78.97 inc VAT
Brand: Tenmat
Model: 1000mm x 75mm - 0.0075m2
Delivery Time: 3 - 5 days
Tenmat FF102/50 Ventilated Cavity Fire Barrier is manufactured from a low smoke zero halogen high expansion intumescent material and covered with aluminium foil, for use horizontally within uninsulated, ventilated and drained cavities, up to 50mm wide. It allows maximum ventilation and drainage..
£24.01
£28.81 inc VATShowing 1 to 17 of 17 (1 Pages)