


")

Why Insulate Electrical Outlets in your Home
by Mark Row
Some Practical and Economical Solutions
If you have ever heard people talking about insulating some parts of their home, electrical outlets are probably not the first thing on your mind when you think about weatherizing your home. There are a few simple reasons to insulate electrical outlets in your home. First of all, you may not notice, but these areas are nothing more than holes in your walls filled with wires, meaning that they present a great source of cold and warm air entering your home through all those small gaps. This can all affect your home’s inner temperature and only reduce the positive thermal effect of having a properly insulates walls, floors and ceilings. Secondly, it is not too costly, since it involves only a few tools, some specially designed materials and your two crafty hands. Namely, you will not have to spend tones of money on expensive home insulation products or hire a professional to do it, but it will take you not more than a day to insulate your outlets and switches and you will soon be able to notice considerable difference.
Outlet Insulation – Step by Step
Now, once we have considered some positive effects of having insulated outlets in your home, let’s get you prepared for the installation part. What is extremely important every time you are dealing with electricity is to always turn off the power and double-check whether it is off, in order of avoiding certain discomforts later on. Another thing is to try to turn this into a small project, even if takes you a whole day to insulate all the outlets in your home. This may sound tiring, but note that firstly – if you have already decided to perform such task, it is always better to be practical and get the job done and secondly – taking care of this problem in only one room or other space in your home may just not be sufficient in terms of improving your home’s thermal performance.
Finally, always make sure to get everything you need before you start the outlets and switches insulating part. This includes checking you outlets, that is measuring them in order of purchasing the right-sized and right type of foam gasket you will later on use for insulation. Also, since your project already includes taking off the outlet cover (or the switch plate), it would be wise to check the wiring and determine whether any repair work needs to be done. If this is the case, always consult an electrician and don’t try performing any repairs yourself.
And, now the instructions:
- As mentioned before, always switch of electricity first, best at the main panel. Also, check whether the electricity is off by, for example by plugging in some small devices, like an iron or a blow dryer or, if equipped, use a circuit tester.
- Once you’ve made sure there is no electricity in the outlet, you may move on to the outlet insulation part which starts off with removing the outlet cover (or the switch plate) by using a screwdriver.
Note: Make sure to place all the screws in the same place, in order of avoiding losing any.
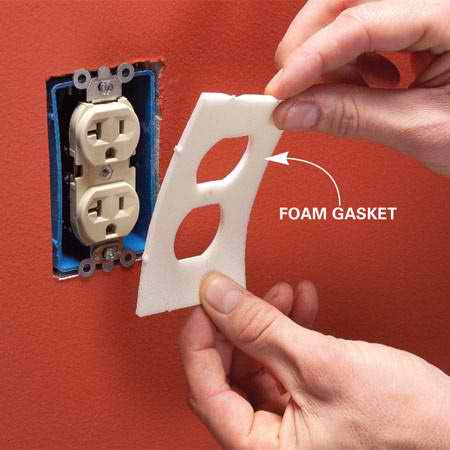
- Now’s the time to use the foam gasket you have previously purchased from your home or hardware store. Since the gasket should match the type and size of the outlet, place the gasket over the outlet cover and do some cutting if necessary. Place the cover face down and position the gasket over the inner side of the cover (or a switch plate) with the tacky side facing the cover. Center the foam gasket as much as you can, since there is a chance it will overlap the cover.
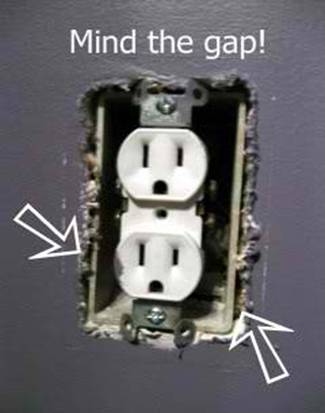
- Always check for gaps and holes between the junction box (the box behind the wall housing the wires) and the inner wall, since these areas should also be insulated for a better result. This can be done by either using spray foam insulation or by caulking. The first option includes spraying foam insulation on places between outer edge of the junction box and the wall surrounding it. The second one involves using a caulking gun and some window sealant. Just caulk the seams surrounding the outlet and push it into the seams by using a utility knife. Finally, in both cases, just use a wet cloth to clean any extra spray or caulk around the outlet cover.
- Put the outlet cover now reinforced with the insulation foam back into place which may also involve screwing through the foam gasket.
- Finally, place your hand in front of the outlet and see that there is no air leakage. Just turn the power back on and admire your one-day work.
Well, that is about it, now you can fully enjoy all the benefits of having properly insulated outlets and a much more energy efficient home.
Not sure you could handle this job? Hire a professional. Need more home improvement tips for your home insulation project? Take a look at other Insulation London blog articles and our affordable product range.