


Get Ready for Ceresit CT 34 Smooth Mineral Render

Achieving an Insulated Render System: A Comprehensive Guide
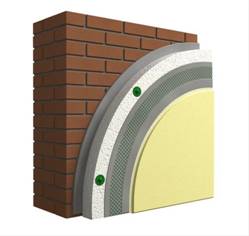
If you're considering a façade remodel, now is the perfect time to take it a step further and choose a system that offers both functionality and aesthetics. It's crucial to strike a balance between these two elements, as such an investment can pay dividends in the long run. Carefully selected components of an external wall insulation system can not only enhance the thermal and acoustic performance of the building envelope but also prolong its lifespan and improve its appearance – an equally important consideration. To make your life easier, we're here to present one such system and introduce you to Ceresit CT 34 smooth mineral render, a key component.
Ceresit CT 34 Render: An Overview
Firstly, let's delve into the Ceresit CT 34 mineral render. It is a white, flexible, and fibre-reinforced mineral render used as part of external thermal insulation systems for smooth surfaces, applied both internally and externally. The render is easy to apply, offering good adhesion and resistance to various weather conditions – a crucial feature for external applications. In addition to its primary use in external insulation systems, it can also be used to repair traditional plasters, both inside and out (in very thin layers), as well as to smooth plaster surfaces or fill deep voids.
Before installing the entire system, which includes the CT 34 smooth render, it's important to keep a few things in mind regarding the preparation, application, and storage of the render. It can be stored for up to 12 months if kept in dry conditions and the original packaging. The render is prepared by mixing with clean water and stirring with a mixer drill until it becomes smooth and lump-free. Small amounts of water can be added to achieve the desired density. Ensure that the render is applied in dry conditions, with the temperature optimally between 5 and 25°C. Finally, remember that the render should not be applied to highly insulated walls, and the surface needs to be properly protected from rapid drying and rain for at least 24 hours.
Constructing the External Insulated Render System:
- Properly prepare the substrate surface:
- Ensure the surface is even, sound, and free of grease, dirt, or contaminants.
- Remove any moss and algae with a steel brush, treat with Ceresit CT 99, and allow to dry.
- Use Ceresit CR 61 to remove any hollow or loose render and level any unevenness.
- If dealing with aerated concrete blocks or similar high-absorbency materials, prime the surface with CT 17 primer.
- Fix the base profiles:
- Fix the base profiles at 300mm centres using appropriate mechanical fixings.
- Ensure the base profile is level, using spacer washers on uneven surfaces to avoid profile deformation.
- Take special care when installing base profiles at internal and external edges to provide continuity at the façade bottom edge and the line.
- Cut the profile to size without breaking the external vertical edge and use connectors to join the base profiles.
- Prepare and apply the bonding adhesive:
- Prepare the bonding adhesive and trowel it in a thin layer onto the mineral wool board surface to provide better adhesion.
- Apply the adhesive mortar in two ways:
- Cover the entire surface of the insulation material with a notched trowel.
- Apply the adhesive in 3-4cm strips along the edges and place 8cm dabs in the middle of the board, at equal distances.
- Firmly place the insulation boards onto the wall, arranged in a brick bond pattern, and press them starting from the bottom to the top.
- Use a straight edge or a steel trowel to ensure even distribution of the adhesive and remove any excess mortar.
- Fill and smooth the insulation surface:
- Fill any gaps in the insulation with insulation strips or low-expanding polyurethane foam.
- Smooth the surface of the insulation boards by cutting any protruding corners with a saw and straight edge, and remove any remaining unevenness by rasping the board edges.
- Add additional mechanical fixings:
- Follow the standard fixing patterns to add additional mechanical fixings.
- Use a drill bit to reach the substrate through the installed insulation board and insert the specified Isofast insulation fixings.
- Install additional reinforcements:
- Add reveal beads around window and door openings.
- Protect building, window, and door corners with a wing mesh bead embedded in reinforcing mortar.
- Incorporate an expansion joint profile to accommodate movements in the building fabric.
- For additional reinforcement around door and window openings, add 350mm x 250mm reinforcement strips at an oblique angle to the opening.