


")

")


HardieBacker Cement Boards Installation Instructions

HardieBacker Boards Characteristics
HardieBacker cement boards present a perfect substitution for traditional plywood and plasterboard substrates, due to the increased dimensional stability, strength and overall improved moisture and mould resistance. They include a patented Mouldblock Technology which only expands their application to even the wettest areas such as kitchens and bathrooms which is not the case with the available alternatives. Namely, while traditional tiles and internal finishes substrates cannot fight the mould growth or moisture expansion, thus causing cracking of the tiles, timber wrapping and only increasing maintenance costs, these boards are gypsum free, meaning that they will not disintegrate when exposed to high levels of moisture. The boards are available in two sizes, 6mm and 12mm, and differ in application and installation process. The 6mm boards are mainly used for floors, while the 12mm boards are meant for wall substrates. Both available board types are applicable to masonry walls, when the access is limited.
Installation Precautions
Prior to moving on to the HardieBacker board installation instructions, it is important to keep a few important facts in mind:
- the boards require no primer;
- the boards cannot be installed with the dot and dab method;
- the boards are not suitable for external applications;
- the boards cannot be installed onto concrete surfaces;
- it is recommended that the EZ grid side of the 6mm board and the smooth side of the 12mm to be used for tiling;
- the boards can be finished with vinyl, natural stone and ceramic tiles, wallpaper, paint or plaster.
Another important thing you need to know is that the HardieBacker boards contain crystalline silica which is inert itself, but using power tools when cutting or drilling can cause particles to be released which could present danger for your health, if you would be overexposed or inhale larger quantities. In order of ensuring adequate protection, you should always carry the work outside or in a well-ventilated space, use adequate tools, wear protective equipment such as a face mask, and make sure to clean the space and your clothes from any settled debris once the job is done.
HardieBacker Boards Installation
HardieBacker boards can be easily cut with the carbide tipped scoring knife. The boards should be scored with a straight edge and pulled upwards. If you need to make circular cuts, just score the hole, mark the weak point in the centre and tap it with a hammer.
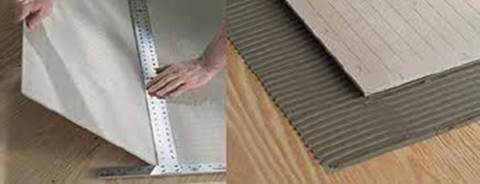
Floor Installation
As upper mentioned, 6mm HardieBacker boards are usually used for internal floors, however the 12mm boards are also applicable in case additional height is necessary.
The boards should be installed onto a clean and smooth surface, so make sure to remove any debris or dust. Also remove and fix any floor damages such as uneven, warped or loose floorboards. In order of avoiding excessive flex which can lead to tile cracks, make sure:
- to use 15mm WBP plywood or minimum 18mm T&G flooring grade chipboard,
- that the floor does not deflect more than L/720 in regard to the natural stone and L/360 in regard to the ceramic tiles and
- that the floor construction meets the requirements set by applicable regulations.
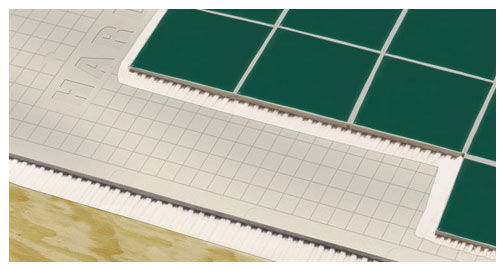
The spacing between the joists should not exceed 600mm centres. The boards’ joints should be staggered in a brick pattern and should not align with subfloor joints, whereas all corners of the boards should never meet at one point. Gaps of minimum 3mm between the wall edges and the floor should be filled with adequate moisture resistant sealant. The boards can be easily scored and snapped and necessary cuts implemented.
The chosen non-flexible tile adhesive should be applied to the subfloor when the 6mm HardieBacker floor board should be slowly embed into the wet adhesive. The boards are fixed to the subfloor surface with screws and nails installed every 200mm, 15mm apart from the edges of the board and 50mm from its corners. A 50mm alkaline-resistant Fibatape should be added over the joints and the tiles installed onto the boards.
Wall Installation
When installing 12mm cement backerboard on walls, make sure that the entire construction is in compliance with the applicable regulation and that all remained dry lining is removed prior to installation. Stud centres should be at maximum 400mm and all corners blocked with adequate timber.
The boards can be installed both vertically and horizontally, so just score and snap the boards and make necessary cuts. If you are using timber studs, then 30mm galvanised nails or screws should be used as fixings. The boards should be installed at least 6mm above the floor and the joints filled with adequate moisture resistant sealant. The boards are fixed 15mm apart from the edges of the board and 50mm from its corners. A 50mm alkaline-resistant Fibatape should be added over the joints and the tiles installed onto the boards. Please consult the applicable regulation in order of determining whether a vapour control barrier is necessary.
Masonry Walls Installation
Both 6mm and 12mm HardieBacker cement boards can be used on masonry walls whenever you are dealing with a confined space.
The boards should be installed onto a clean and smooth surface and all remained dry lining removed prior to installation. The boards are then evenly covered with adequate gap filling cartridge adhesive and pressed against the designated wall surface. Used fixings (stainless steel screws) should not be overdriven but flush with the face of the board. Install the screws at least 50mm into the wall, 50mm from the right and left edges and 100mm from the top and bottom ones. A 50mm alkaline-resistant Fibatape should be added over the joints and the tiles installed onto the boards.
For more info about HardieBacker cement boards contact us on 02080992107 or send us an email at info@insulationshop.co.